
Prepper
Any Prepper has probably thought about building a chicken coop. By building a chicken coop, you’ll be able to raise chickens and harvest their eggs and meat. Their droppings can also be used as fertilizer or be sold off as such. It’s easy to see why a Prepper would want to raise chickens. Below, we’ll be looking through some of the mandatory steps for building yourself a coop.

Step #1: Set Your Goal
Depending on whether you plan on doing it small time to save up on your monthly grocery expenses and help with your preppers checklist, or whether you wish to turn this into a full blown Preppers business, the size of your coop will differ substantially. Before you learn how to build a chicken coop, ask yourself these few questions:
§ Why do I want to rear and raise these chickens?
§ How many chickens do I need to keep?
§ How much space do I have to build the coop?
If you’re unsure of any of these answers, you should start with a small chicken coop. You can easily expand it as you become more experienced or when you start seeing good results.
Step #2: Acquire A Chicken Coop Plan
Regardless of how small your chicken coop will be, you will need to have a clear and detailed plan drawn up. You have the option of designing and creating your own coop prepper styl, but that should only be attempted by experienced coop builders. Assuming you’re a beginner at this, you should purchase some ready-made plans that have been proven to work before (you can get them here). Some of the more complex one would involve the use of different types of building materials and a higher skill level to build so make sure you start off with the easier ones. Here are a few essential factors to be considered for your coop:
Regardless of how small your chicken coop will be, you will need to have a clear and detailed plan drawn up. You have the option of designing and creating your own coop prepper styl, but that should only be attempted by experienced coop builders. Assuming you’re a beginner at this, you should purchase some ready-made plans that have been proven to work before (you can get them here). Some of the more complex one would involve the use of different types of building materials and a higher skill level to build so make sure you start off with the easier ones. Here are a few essential factors to be considered for your coop:
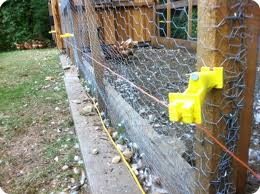
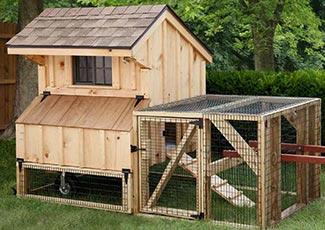
1. Shelter & Protection – Ideally, you’ll want to use chicken wire to cover up the outer portion of the coop like in this picture shown here. The wire mesh is a little hard to see though, but it’s there.
This way, you don’t have to worry about predators dashing into your yard and snatching away the chickens even before they can retreat back into the safety of the coop. Dogs and skunks are some of the most common predators that often do thisYou might want to note that even with chicken wire, the larger dogs or coyotes can easily chew through them. To counter this, you could build an elevated coop that is at least 2-3 feet high with a ramp leading down from it. The ramp would be too narrow for these predators to climb up so they wouldn’t be able to get into the coop even if they’ve broken through the chicken wire. This ramp is also useful if there’s a lot of rain or snow at your area. This allows your chicken to be able to get off the wet ground. Against airborne predators like owls and hawks or small animals that can leap up high (raccoon), ordinary chicken wire will be strong enough to stop them from breaking through.
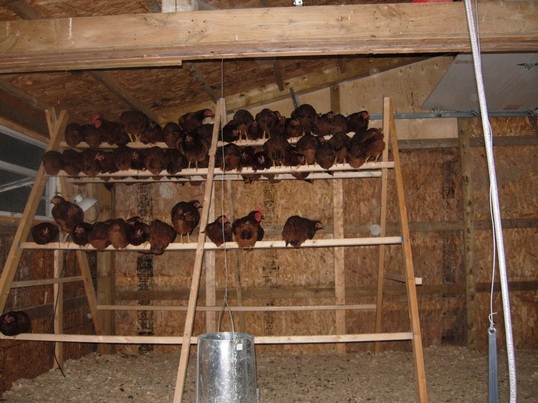
2. Perching Area – Chickens sleep the best while they’re on perches so make sure you include these even if they aren’t shown in your chicken coop designs. Also, you should ensure that there is ample space for all your chickens so they wouldn’t have to cramp up in a small area as this could affect their health. In the picture shown to the left, there’s also a chandelier that emits a warm glow to emulate sunlight. Do use not white/bluish lights though because they don’t work at all. This is useful for seasons where the days are shorter. With these lights, your chickens will still be able to lay their eggs.
This way, you don’t have to worry about predators dashing into your yard and snatching away the chickens even before they can retreat back into the safety of the coop. Dogs and skunks are some of the most common predators that often do thisYou might want to note that even with chicken wire, the larger dogs or coyotes can easily chew through them. To counter this, you could build an elevated coop that is at least 2-3 feet high with a ramp leading down from it. The ramp would be too narrow for these predators to climb up so they wouldn’t be able to get into the coop even if they’ve broken through the chicken wire. This ramp is also useful if there’s a lot of rain or snow at your area. This allows your chicken to be able to get off the wet ground. Against airborne predators like owls and hawks or small animals that can leap up high (raccoon), ordinary chicken wire will be strong enough to stop them from breaking through.
2. Perching Area – Chickens sleep the best while they’re on perches so make sure you include these even if they aren’t shown in your chicken coop designs. Also, you should ensure that there is ample space for all your chickens so they wouldn’t have to cramp up in a small area as this could affect their health. In the picture shown to the left, there’s also a chandelier that emits a warm glow to emulate sunlight. Do use not white/bluish lights though because they don’t work at all. This is useful for seasons where the days are shorter. With these lights, your chickens will still be able to lay their eggs.

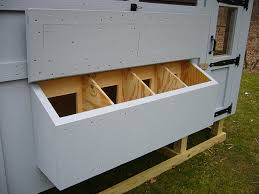
3. Nesting Area – This is where your chickens will be laying their eggs. Be generous with regard to this area because it’s easily the most important place of all. On average, a chicken will lay an egg every 1-2 days. The frequency will change based on the weather conditions as well as the breed of the chicken though. Under a controlled environment (commercial production), a single chicken can lay up to 300 eggs a year. So, unless you plan on collecting your eggs on a day to day basis, keep this area large enough so that all your chickens can lay as many eggs as they can comfortably. Here’s a creative example where these baskets are stuffed with straw and used as nesting areas.
4. Insulation – Because your coop will be located outdoors, your chickens will be continuously exposed to the elements of the weather. Without some form of insulation to guard against the heat or the cold, your chickens will not be able to survive for long. Determine the type of weather conditions that your area is constantly exposed to and base your choice of materials on it. The better chicken coop designs should have taken this factor into account already.
5. Food & Water – These resources should be kept far away from their litter so that they won’t get contaminated. Contamination of food and water in any way could cause diseases to spread through your entire coop. When building a chicken coop, remember to keep these in 2 separate areas if possible.
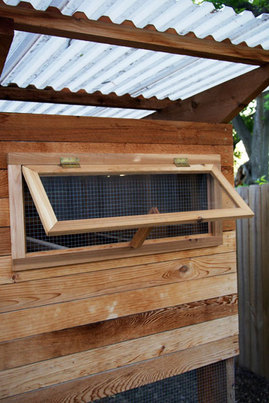
6. Ventilation – As it is likely that the litter will be accumulated within the chicken coop, sufficient air flow is required within the coop to keep the place refreshing. You could cut out little windows or flaps at a few places but be sure to reinforce the openings with chicken wire.
7. Easy Access For You – You’ll inevitably have to clean the chicken coop every now and then. Without an access door, you might have to lean into your coop to clean the inside and trust me, you do not want to do that. The smell will be overpowering and it will take you a long time to do it too. Access doors will allow you to reach in with both your hands easily and do whatever it is you need to do. You could also make it such so that cleaning the droppings becomes a simple process. The ideal chicken coop will have a droppings tray that can be removed from the outside so that you need not reach into your coop every time to clean up the droppings.
Step #3 Gather Up The Required Tools And Materials
Hammers, saws, drills, nails, measuring tape, masks, gloves, wood, chicken wire. All these can be acquired from a hardware shop. These are only some of the tools that you’ll need to use for this though. Check your chicken coop plans for greater details on this.
Step #4: Build Your Chicken Coop
Do not attempt to build the structures based on your whims. You need to do this in a systematic manner. Follow the step-by-step instructions from your coop plans if you have them. You’ll usually have to start by building the bottom foundation and move up gradually from ground up. The roofing, doors and windows should always be the last structures to be installed.
Once your chicken coop has been built, you could paint it as a finishing touch. You’ll be looking at it for a long time so it might as well be pleasing to the eyes. Paint would also add a layer of protection against the effects of weathering.
That’s it! That’s how you build a chicken coop. Remember to keep your chickens healthy by maintaining a clean and comfortable environment and you’ll be rewarded with tons of eggs. It’s a great investment provided you do it right!


 RSS Feed
